How to
How to Record a FaceTime Call on iPhone, iPad, and Mac

There are some situations when we have to record our FaceTime calls but we are unaware of how to record a FaceTime call on any of the Apple devices. Today, we are going to tell you the way through which you can record your FaceTime calls easily. In this article, we are going to explain how to record a FaceTime call on iPhone, iPad, and Mac. You just have to follow some easy steps and you will be able to record FaceTime calls without any issues. There are many software available that allows you to record FaceTime calls. But, we are going to tell you the method through which you won’t have to install any third-party software to record FaceTime calls. There are some requirements that must be performed before starting to record FaceTime calls. Else, you won’t be able to do so. Now let’s get straight to the article without taking any more time.
How to Record a FaceTime Call on iPhone, iPad, and Mac?
Here’s how to record a FaceTime call on iPhone, iPad, and Mac. Just follow some easy steps and you will be able to record FaceTime calls on your Apple devices:
Step 1. Connect your iPhone or iPad to your Mac using a lightning/USB Type C cable.
Step 2. Now launch QuickTime Player on your Mac.
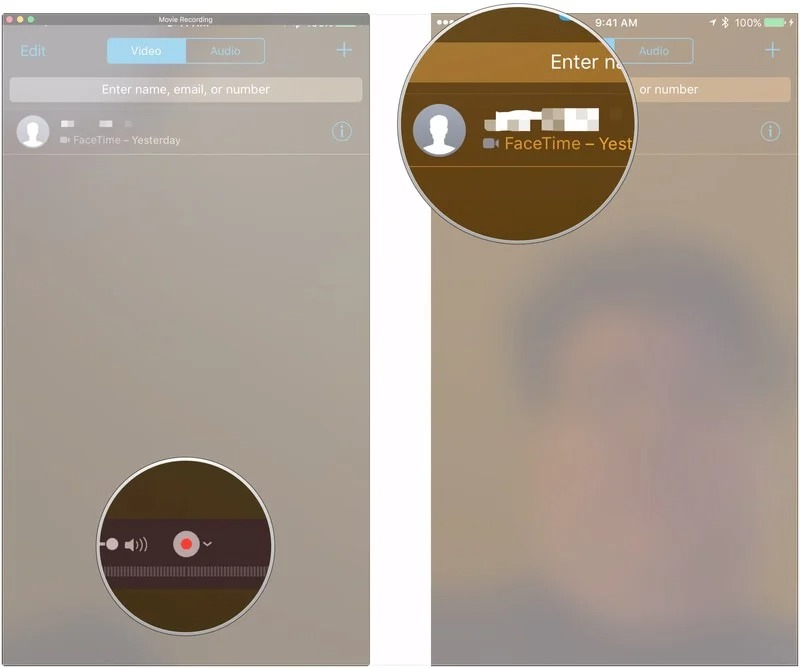
Step 3. After that click on the File menu then click on “New Movie Recording”.
Step 4. Now click on the arrow right next to the recording button in the QuickTime Player window.
Step 5. Select iPhone or iPad available from the list of cameras.
Step 6. Unlock your iPhone or iPad and you will be able to see your iOS or iPad display in the QuickTime Player on your Mac.
Note: Do make sure that the volume is turned up in QuickTime Player.
Step 7. Now launch the FaceTime App on your iPhone or iPad and click on the Record Button in QuickTime Player on your Mac.

Credit: iMore
Step 8. Start a FaceTime call from your iPhone or iPad to record it with audio using your Mac.
Step 9. Once you have ended the FaceTime call click on the stop button to end the recording. Finally, click on the File option then on Save, and select the location where you want to save the FaceTime call recording.


Credit: iMore
How to Record a FaceTime Call on Mac?
Here’s how to record a FaceTime call on Mac. You will be able to record your FaceTime calls without any issues in some easy steps. The requirement to record FaceTime calls is the QuickTime Player. You don’t have to worry as QuickTime comes pre-installed in macOS. Here are the steps:
Step 1. Firstly open FaceTime App on your Mac, then press Command+ Shift+ 5.
Step 2. A screenshot toolbar will appear which offers you access to Screen Recording.
Step 3. Now click on the Options button on the Toolbar and select the preferred location where you want to save the recording.
Note: All screen recordings are saved on Desktop by default.
Step 4. Select the Built-in Microphone under Microphone to record your FaceTime calls with audio.


Step 5. Now you will see two recording options on your screen “Record Entire Screen” which allows you to record the entire screen and “Record Selected Portion” which allows you to record only the selected portion of the screen.

Step 6. Select the preferred recording option and hit the Recording button to start recording. Now Make a FaceTime call and it will be recorded with audio.
Step 7. Once you have ended the FaceTime call click on the Stop Recording button on the top menu bar. After you have stopped the recording it will be saved at your selected location.


That’s All For Today. Stay Tuned To TechBurner For More Stuff.
