Custom ROMs
How to Root Samsung Galaxy F41 & Unlock Bootloader: Step-by-Step Guide

Recently, Samsung has unveiled its latest device called Samsung Galaxy F41. It is an excellent device that comes with One UI based on Android 10. In this new era, people love customizations; however, the stock ROM comes with customization limitations. In this article, we will help you out in how to root Samsung Galaxy F41. And to root your device, you first need to unlock the bootloader in Samsung Galaxy F41, and you need not worry as we will also discuss how to unlock the bootloader in Samsung Galaxy F41. Moreover, we will discuss how to unlock the bootloader and then root your Samsung Galaxy F41. So without any further ado, let’s head into this article.
Samsung Galaxy F41 Features


The device was launched on 8th October 2020 for the Indian market. It was launched with a triple rear camera featuring 64MP + 8MP + 5MP, and for selfie shooting, we get a 32MP front camera. Also, it comes with Samsung powered Exynos 9611 that is 10nm based processor, and also it has 6GB RAM and 64/128GB storage variants available for the device. Moreover, it comes with a massive 6,000mAh battery capacity with the support of up to 15W fast charging. Talking about the display, a Super AMOLED 6.4-inches display comes with 1080 x 2340 pixels. Now, as you have the core info about the device, let’s move ahead.
Must Read | Realme 7i Vs. Realme Narzo 20: A Confusing Comparison
What is Root?


Before rooting, you must know what rooting is. We will briefly explain the whole concept of rooting for you. Rooting a device gives the administrator permission to the user. A user with a rooted device has full access to the device and can install custom ROMs and some applications that are not available for normal users. Rooting a device has its pros and cons like – having full access to your device, installing custom ROMs, etc. and disadvantages include voiding the warranty and boot loop sometimes.
How to Unlock Bootloader in Samsung Galaxy F41?
Before rooting your device, you will need to unlock the bootloader. To unlock the bootloader, you need to have more than 40% battery and a full device backup for safety. Now follow the steps below carefully to unlock the bootloader.
Downloads:
Step:1 – Firstly, you need to turn off the device and enter the download mode by simultaneously pressing the volume down and power button.
Step:2 – You will see many options, and you need to press the volume up button. Then you need to open a new screen and again press the volume up button.
Step:3 – Now the bootloader will be unlocked, and all your data will be cleared.
How to Root Samsung Galaxy F41?
Rooting will go into two parts, firstly, creating a patched boot image.
Step:1 – You need to download the SM-F415F file. Then you need to Extract the files in downloaded firmware with 7zip or any other unzipping software.
Step:2 – Click AP File and again Extract.
Step:3 – Convert boot.img.lz4 to boot.img.tar (right-click, 7zip, add to the archive, change archive format to tar).
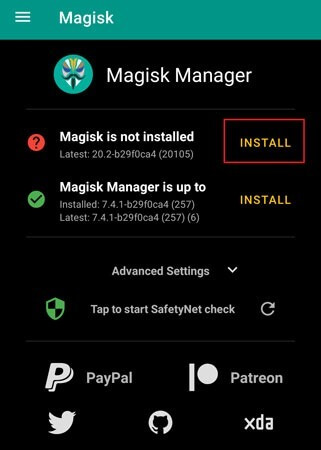
Step:4 – Now you need to copy the boot file and transfer it to your internal storage. Then you have to download and install the Magisk on your device.
Step:5 – From the Magisk Manager app, go to Install → Install → Select and Patch a file and select the boot file you will transfer earlier.

Step:6 – When the boot image has been patched, copy the magisk_patched.tar file, then paste on your computer.
Moving to the second part, you need to flash the patched boot image using Odin Flash Tool.
Firstly, you need to download the latest Odin Flash Tool.
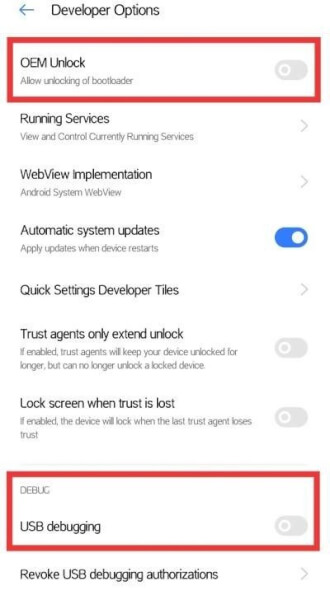
Step:7 – Now, you need to enable USB debugging and from developer options.[To enable it, you need to head in about the phone and then tap 7to8-times “Build Number” for allowing developer options].

Step:8 – Now connect your device to PC. When connected, the log will appear, informing the connection status with your device.
Step:9 – Tap on the “AP” button, select magisk_patched.tar file, and uncheck auto reboot.
Step:10 – Now press the start button, it takes around 10-minutes to complete the process in typical cases, and it shows a Pass at the top of the screen, which means it is done.
Step:11 – After completion, press Power + Volume Up simultaneously, then Bootloader warning release both the buttons. Now it will boot into the system, and you can enjoy Magisk Manager.
Must Read | Download Samsung Galaxy F41 Stock Wallpapers Now
That’s all for this article. Stay Tuned With TechBurner For More Tech Stuff.
