Featured
How to Remove the Activate Windows Watermark on Windows 10

If you are running the trial version of Windows 10 or 11, you may have seen an ‘Activate Windows’ watermark on the bottom right corner of your screen. When you use your computer, the watermark displays on every window and program you open. Also, without activating Windows, you can’t customize your desktop or get Windows Defender updates. You may think you have to purchase the activation key to remove the Activate Windows watermark. But what if we told you that there are other ways to get rid of Activate Windows watermark without really activating the OS? In this article, we will tell you 3 super easy and free methods to remove the Activate Windows watermark on Windows 10 and 11. Stay tuned!
How to Remove The Activate Windows Watermark on Windows 10 and 11?
On Windows 10, you’ll have to make some registry adjustments. Let’s have a look:
Disable Activate Windows Watermark using PowerShell
- First, open Windows search and enter PowerShell into the box. Select Run as administrator from the context menu after right clicking.

- In the Windows PowerShell window, type the command shown below and press Enter.
slmgr /renew

- Restart your computer when you’ve finished.
This will extend the company’s free trial time. During the trial time, the Activation watermark will not appear on your screen.
Disable Activate Windows Watermark using Registry Editor
You can remove the Activate Windows watermark using the Windows Registry. Here are the steps:
- Launch the Run box using the Windows Key + R. Type regedit and press Enter.
- Go to the following route in the Registry Editor:
Computer > HKEY_CURRENT_USER > Control Panel > Desktop
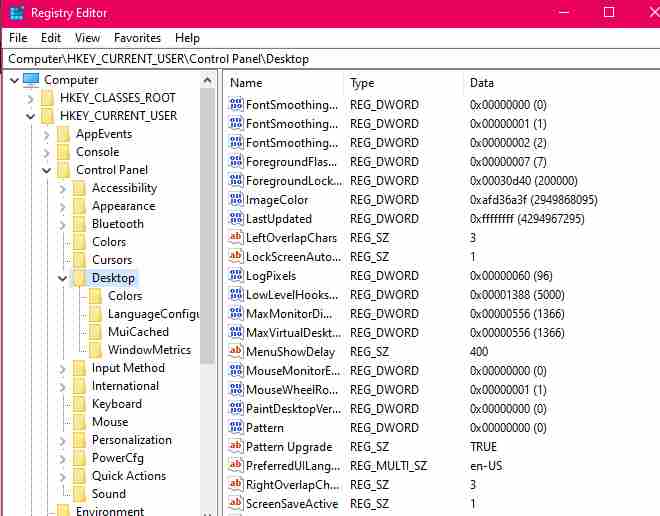
- Locate the PaintDesktopVersion key on the right side and double-click it.
- Type 0 in the Value data box and click the Ok button.
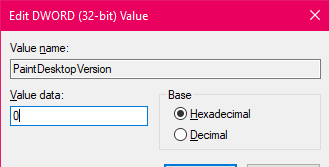
After you’ve made your adjustments, restart your computer to get rid of Activate Windows watermark.
Disable Activate Windows Watermark using Batch Program Executor
Although Notepad is a basic tool, it is quite strong. You can also remove Activate Windows watermark using Notepad:
- Open a Notepad and paste the code.
@echo off taskkill /F /IM explorer.exe explorer.exe exit

- Tap the File menu and select Save As.
- Save the Notepad file with .bat extension
- Right-click the.bat file and choose Run as administrator
- Restart your PC
That’s all. We assure you that these approaches will assist you in removing the Activation Windows watermark.