Featured
Professional Portrait Photo Editing Tips : Snapseed Portrait Photo Editing Tutorial
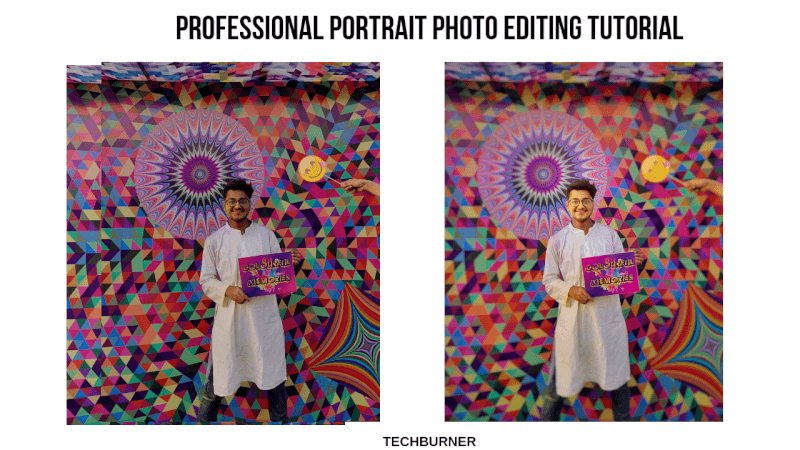
Welcome back to another article of our Photo Editing Series. In the previous article, we have talked about Landscape photo editing. If you haven’t read the first article we suggest you read that article first. This article is about Professional Portrait photo editing tips. We are going to talk about Snapseed Portrait photo editing. We all want to look good, aren’t we? Read the entire article to learn how to make up on your photo!
Free Professional Photo Editing App Download: Snapseed Photo Editing Tips [Landscape Photos]
Portrait Photo Editing Tips
First thing first, download the Snapseed app from Play Store or App Store or you can download the app from the above link as well. Installed, okay so now let’s start the tutorial.
Definitely, the first step is to select the photo you want to edit. Click on the Plus button and select the photo.
Tip – To use the beautification mode is always a bad idea. Beautification mode simply decreases the sharpness and details of the photo and makes it smooth which does not look professional. We suggest you capture a portrait photo or selfie without beauty mode and then edit the photo with the following Snapseed Portrait Photo editing method.
Portrait Styles
You will find 11 Styles in the Snapseed app, which is basically Presets. There is a Portrait style too. You can use this style. The person will light up a little and everything else will become a little dark. By using this style you will lose some details of the photo. If you are editing a colorful photo such as we are editing then go for the Pop style.
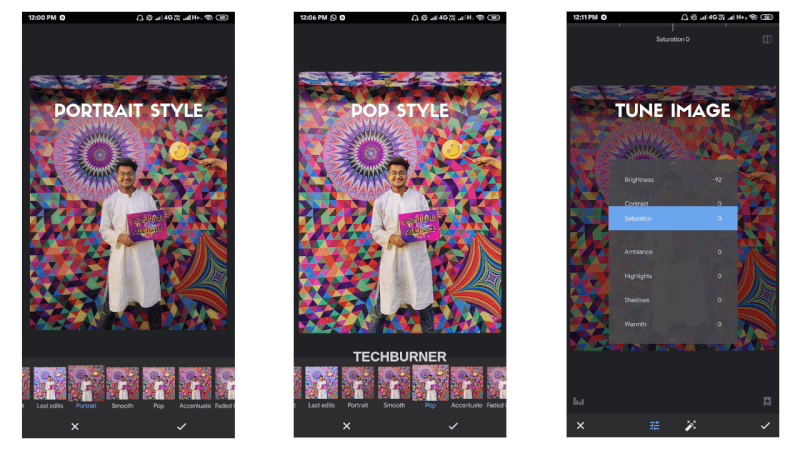
Tune Image
Never forget to adjust the brightness, Saturation, Contrast etc by using Tune Image Tool. Adjust these parameters to make your portrait photo much better. We suggest you increase brightness and saturation a little to make it more attractive. The first step is complete.
Portrait Tool For Editing
There is a number of tools are available in Snapseed. One of the best tools for Portrait photo editing is Portrait. Just tap on the Portrait tool and you will see a significant change in your photo.
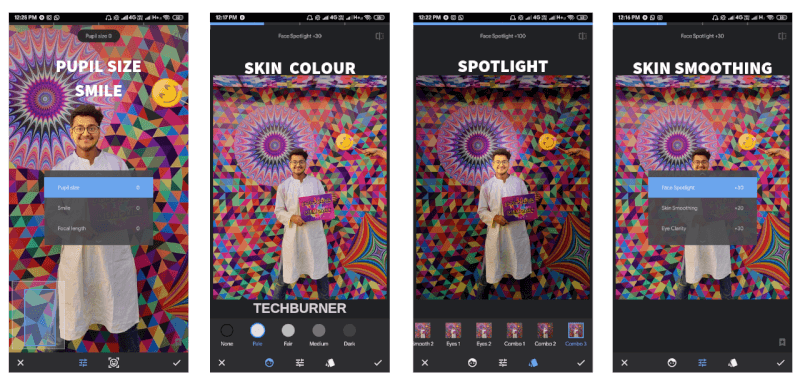
- Change the Skin tone – Pale, Fair, Medium, Dark and None
- Adjust Skin Smoothing and Face Spotlight as well as the Eye clarity.
- Use different filters available. Spotlight filters basically increase the brightness around the face while making everything else a little dark. Our favorite filter is Combo 1.
After using the Portrait tool let’s now move on to Lens Blur tool.
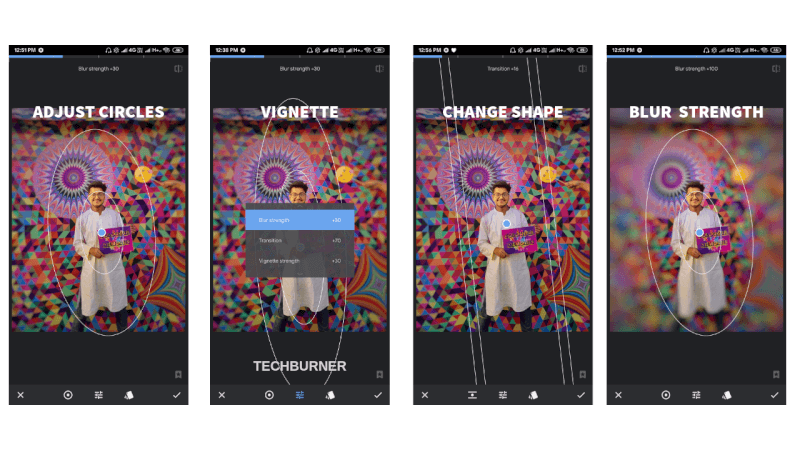
Portrait Mode Blur – Lens Blur
Almost all new smartphones now have dual camera setup. NO, not just two cameras. Triple camera, Quad camera, and Penta camera are very normal now. However, the Pixel 3/3 XL has only one camera which captures extremely beautiful portrait shots with the help of the software.
If you are still using a single camera smartphone or your Smartphone camera’s edge detection is very bad (Few Brands) then Snapseed is the perfect app for you to get that natural blur or bokeh effect.
- Tap on Lens Blur Tool. You will see two white circles and a blue small circle.
- Hold the blue circle and drag it on your face.
- You can increase or decrease the size of the two circles, Pinch with two fingers. Additionally, you can change the shape of the circles as you can see in screenshots.
- Swipe left and right to decrease and increase the Blur strength respectively.
- There is a Vignette option as well. The first button on the bottom bar allows you to change the circles into parallel lines. Play with all these features and get the perfect bokeh effect.
Tip – Use the Vignette tool. Basically, this makes the outer border either dark or light based on what you choose. Overall gives a professional look to your photo. Remember our tip from the first article to take a 5-minute break while editing any pic. We will meet after 5 minutes :p
Head Pose Tool
Head Pose allows you to change the angle of your face. Swipe in any of the direction and your face will move that side. This is something interesting. Also, this tool allows you to change the Pupil Size, so if your eyes are too small you can change the size.
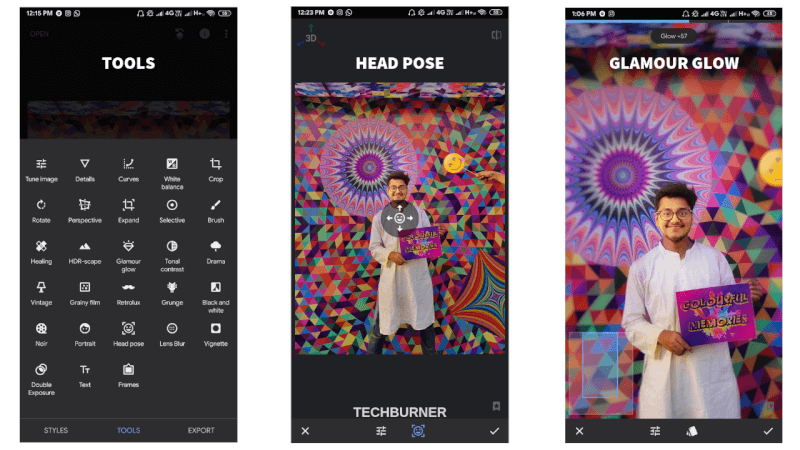
Sometimes the photo we have taken is good but we forgot to smile at that moment, so don’t worry. Just increase the Smile by using this tool. You can make yourself slim by changing the focal length.
Glamour Glow
This tool is very much similar to our camera’s beauty mode. It provides smoothness to the photo. It looks good sometimes, however, we don’t like it. But try this tool at least one time because it makes you more beautiful!
Export
Okay, so the photo is ready. Hit that Export button from the bottom bar. You can also hit the bell icon on this page to get notified every time we publish an amazing and very useful article.
Wait, let’s talk about some additional editing tips. You don’t necessarily need to use the following tips in every photo.
Retouch Skin – Blemish Remove
The previous photo does not need any kind of Skin retouch. In case you want to remove the blemish from your face you can use the following method.
- Select the photo you want to edit.
- Tap on healing button and pinch to zoom in your photo.
- Now, tap on pimples or blemish to remove it.
- That’s it. You don’t need any kind of beautification mode just use this tool to make yourself beautiful.
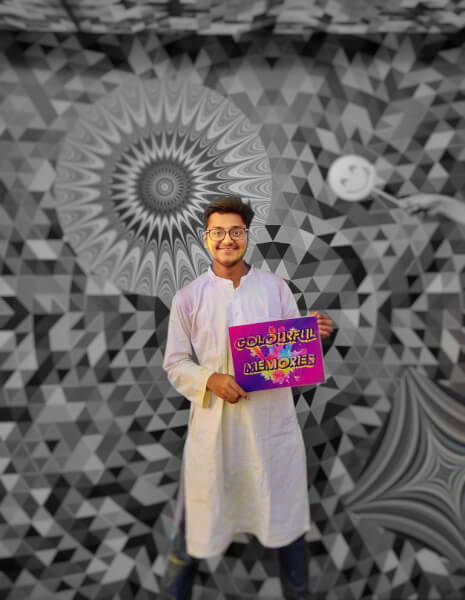
Colour Pop – Black & White Background
How cool it looks if the subject (you) is colorful while the background is completely black and white. The similar feature is available in Google Photos but it requires portrait photo captured in Google Camera but with the help of Snapseed, you can make any photo Colour Pop.

Tip – You can use this feature for landscape photo editing as well.
- Select the photo you want to edit.
- Now go to Styles and select the Fine Art. The photo will become completely black and white.
- If you don’t want to use the style then you can go to Tune Image and decrease the saturation completely. Same, the photo will become black and white again.
- Now Tap on the arrow button on the top and select View Edits.
- Select Tune Image and Brush.
- Now brush the background. Make sure that the “100” is written at the bottom.
- You can do the opposite than it. First tap on invert option. It will make the entire photo black and white. Now set the value to Zero and bush the subject. That’s it.
- Pinch and zoom while brushing to make it more accurate. Export the photo.
That’s all in this Snapseed Portrait Photo Editing Tutorial. Many more articles on photo editing are coming very soon so stay tuned with us. Also, let us know in the comment section below which app do you use for the photo editing?