Must Read
Free Professional Photo Editing App Download : Snapseed Photo Editing Tips [Landscape Photos]
Post-processing of any image is very much necessary before posting it on any social media. There are a number of Professional photo editing apps and software available for the photo editing, some of them are free while others are paid. In this article, we are going to talk about the best free professional photo editing app Snapseed. Snapseed is a free mobile app by Google for both Android and iOS devices. Read the entire article for the Snapseed Photo Editing Tips.
Download & Install Snapseed
Snapseed is one of the best photo editing tool. It is developed by Google and the app is completely free. No, the app will not show you ads because it’s totally ad-free. First thing first Download and install the Snapseed app from the below links.
Select The Highest Quality
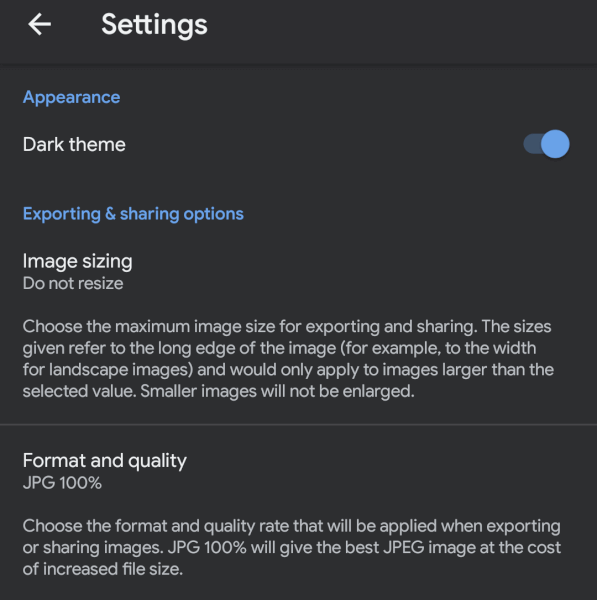
After the app is installed, go to the setting of the app. Select “Do not resize” in the image sizing and Select either JPG 100% or PNG in the Format and quality option. We find that the PNG file is very large in size and has a little more details while the JPG 100% is smaller in size. Select the option according to your use. Don’t select JPG 95% or JPG 80% because it will decrease the quality and we at Techburner believe in Quality. There is also the Dark Mode option. Now if you have done this, let’s now talk about Snapseed Photo Editing Tips.
Landscape Photo Editing Snapseed Tutorial
Let’s first talk about how to edit landscape photos like natural scenery, building or architecture or anything else. The screenshots for every step is present so don’t forget to check them.
Select the photo you want to edit.
Styles
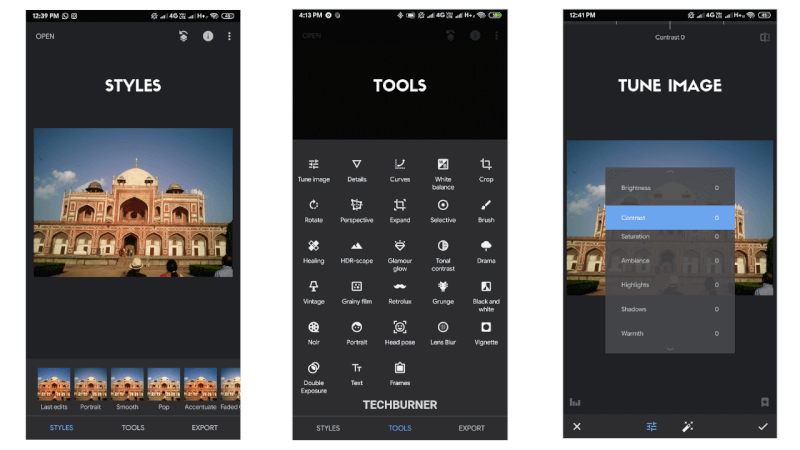
There are 11 Styles available for quick photo editing. Just click on any of the styles and the photo will start looking much better. The Pop style looks good for the landscape pics. But we are going to edit the photo manually without using the presets.
Tune Image
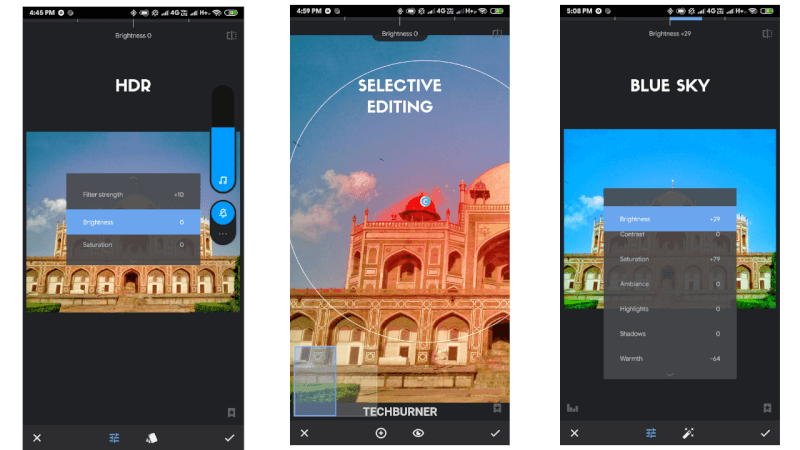
Open Tools and select Tune Image. You can manually adjust the Brightness, Contrast, Saturation, Highlight, Shadows, Ambiance, and Warmness. Swipe up and down to select the option and swipe left and right to adjust. Usually, you should increase brightness and saturation. Select other parameters according to your picture. There is an auto mode present at the bottom if you don’t want to adjust manually. Once you have done this hit the right button. You can do this as many times as you want.
Details
Details play an important role, especially in landscape photography. Nowadays smartphone camera lenses (48 MP!) are capable of capturing a lot of details but you improve it to make it look more pleasant to eyes. Now choose Details from the tools and adjust the structure and sharpness. Use swipe right-left gesture to adjust. Make sure that do not over sharp the image because it does not look good. Tip – Tap and hold the image to view the unedited image. It helps a lot.
Curves
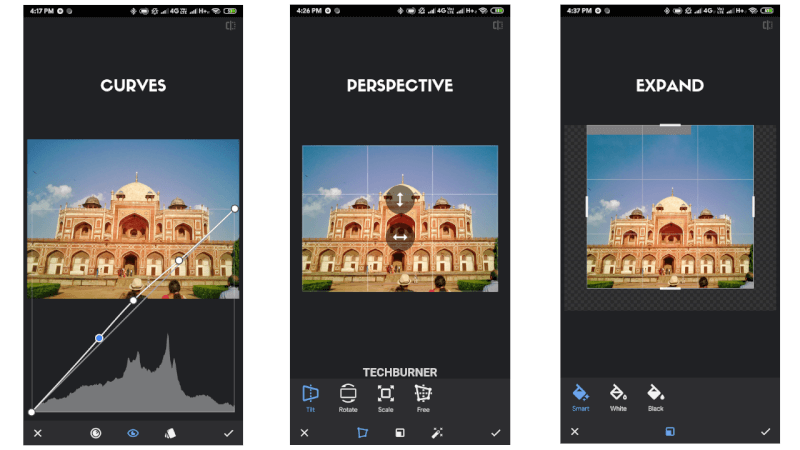
Not everyone is familiar with Curves. It controls brightness, contrast, highlights, and shadows. The diagonal line is the contrast curve. You can place additional pins along this line and change the shape of the line to make tonal adjustments to dark and light areas of the image. Lifting the curve above will increase the brightness. The extra pins assist to isolate which tonal range of the image will be affected. Give it a try.
Crop, Rotate & Perspective
Symmetry is always a good idea in photography. So make sure the subject is in the center of the frame or on any of the one side. Crop and Rotate the image to make it look more good. One very useful feature of Snapseed is Perspective. When clicking the image of any architecture sometimes we are not able to find a good angle. So, you can change the perspective of the image with the help of this feature. For example, this Humayun’s Tomb is captured from a very low angle. It’ll look better after changing the perspective.
Expand
This is an amazing feature. Especially in landscape photos if you want to expand the Sky or any part of the image you can do it in Snapseed. Select Expand tool and stretch the image where you want to expand and you will see that the image is expanded. Isn’t it cool?
Healing
Few random people or animals in a good image can make your photo bad. Even electricity wires or some garbage is not good. You can remove it with the help of the Healing tool. Select the tool and touch on the element you want to remove and magic, it will be disappeared. Use this tool slowly and by zooming in the picture.
HDR Scape
HDR (High Dynamic Range) can improve the overall image by enhancing the shadows and highlights of the image. It means the sky will look clear at the same time the leaves of the tree will look better too. You can adjust the HDR intensity by swiping. Use this tool to give that perfection in your photo.
Tip 2 – A study suggests that taking a 5-minute break while editing photo can improve your editing skills. So, don’t edit your photo in one sitting, it’s better to divide photo editing into two phases.
Selective Editing
Sometimes the entire photo doesn’t need editing. After completing the photo editing, a few portions of the image needs selective editing. Select the selective tool and touch on the portion where you want to edit. You can zoom in and out to edit that portion perfectly. Observe the entire image and find the area which needs to be selectively edited.
Make Sky More Beautiful
The sky is the most beautiful part of the landscape photos, we can make it more beautiful by editing. Let’s do it.
- Go to Tune Image, Increase the brightness to +30.
- Increase the saturation to +40 to +50.
- Decrease the warmness to -50 or -60. (Change this based on how blue the sky you want)
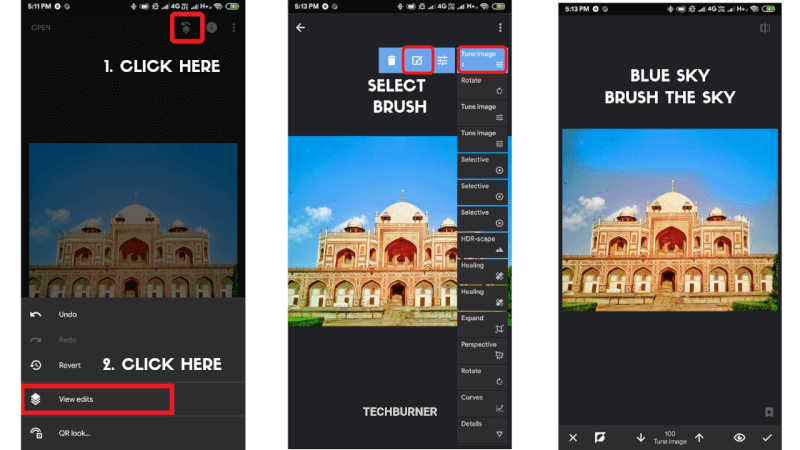
- Now the photo will look a little bad but don’t worry. Tap on the Arrow present at the top and select view edits.
- Now select that last option and choose the brush.
- Now just brush the sky with color. Other portion will be the same and the sky will very beautiful.
Noise Reduction
Okay, so sometimes or we can say that every time there is some kind of noise present in the photo. Especially in the sky or any open places. Just tap on Details tool and decrease the structure. That’s it, the noise will be disappeared. If you want to remove noise more accurately then you can follow the above step and brush the portion where you want to remove the noise.
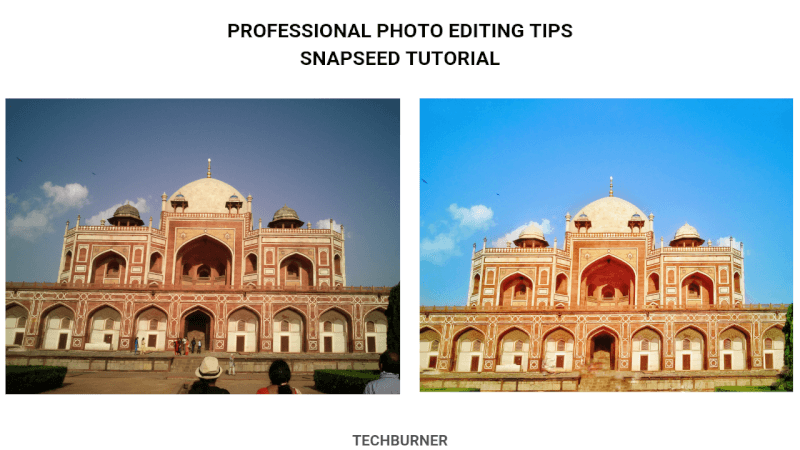
Before & After
Export
Well done. You have edited a very amazing photo. Now it’s time to export it. Hit that Export button from the bottom bar. You can save this look for future editing as well.
Wait, this is the first article of our Photo Editing Series. In upcoming articles, we will take the Photo Editing to the next level. Portrait editing tips and many more tutorials are going to come very soon. Stay tuned with us and hit that bell icon to get notified every time we post an amazing new article. Let us know which editing app are you using in the comment section below.